#makeportraits a bts look - Jess

A behind the scenes look at a recent portrait with Jess.


There is a considerable amount of preparation that goes into making just one wet plate collodion portrait. 

My preparation starts weeks before the proposed shoot with the acquisition and manufacturing of the chemicals involved in making an image.

Once the chemistry is sorted or in progress, I turn my attention to the sitter. Based on their most current image they send to me or on their public social media images, I start to create concept or mood board for the type of image I feel will suit their face for a portrait. I will often do this via Pinterest, although I usually keep upcoming portraits locked as private, only sharing them with the sitter or my creative collaborators.  

After creating a shortlist of images, either based on my preference, the sitters preference or my creative collaborators preference, I start deconstructing the lighting, then re purposing it for my own vision.

Check out the BTS images Feel free to leave comments. 

Sitter: Jess Lowcher

Collodionist:Paul Alsop

Creative collaborator:Ani Fourie

BTS Photographer: Justin Aitken

The final act

One of the things I love about this Wet Plate Collodion lark is that is makes you use more of your senses than you do when you make a digital image. 

Obviously you have to see the image and compose it, it's very tactile and my touch can either make or break the final image. One of the thing I get all of my sitters to do is smell all the chemicals as I am using them, the ether in the collodion may be able to get you high or anesthetise you, but  most fragrant of them all is the varnish which contains lavender oil.

Varnishing is a part of the process that alot of wet plate practitioners struggle with. The choice of varnish is always contentious, with arguments both for and against different resins. The two most popular varnishes are a) Gum Sandarac, this is the gum from the African cyprus-like tree  and b) Shellac, which is a by-product that is produced from a female Lac bugs bottom (yes that's right, bug poo). I have come up with my own varnish, a New Zealand first, using the gum from the NZ native and massive Kauri tree

The final piece of the wet plate collodion puzzle is difficult, but very important. Once made and dried, the wet plate collodion image is very fragile and susceptible to scratches and damage. Over time, oxygen oxidises the silver and tarnishes it, changing the colour and contrast of the image. To seal the image for eternity from physical and oxidative degradation, a varnish is applied.

In addition to the resin, there are two other components important in the varnish, Lavendar oil which acts as a hardener/drying agent (and smells lovely), and 96% alcohol, which is the solvent in which the resin is dissolved.

In my first 8 months of making wet plates, varnishing was my worst enemy, I followed the text books and used Gum Sandarac, my images melted, which was more than frustrating to say the least. 

Early failings

Where once there was an image, now there is modern art.

Over the first 8 months, I lost count how much money I ploughed into my own varnish research, I tried almost everything I could get my hands on at the DIY or art store, I tried marble wax, liquid glass, water based acrylic, oil based varnishes, store bought shellac ..... none of it worked. I went back to trying gum sandarac again, but time and time again it melted my images. I was stumped. It actually turned out that the collodion I was using, had a different, older alcohol content than I was mixing my varnish up, this was a Eureka moment, once I got the alcohol in the collodion and the alcohol in the varnish the same ..... no more melting images! However, I was left a bit disappointed with the finish from the Gum Sandarac, which led me to continue experimenting.

I looked at the USA, a chap called Gerald Figal was doing alot of his own research into period specific varnishes of the 1800's, and it turned out that the hotly advocated gum sandarac was actually not the varnish of choice, most photographers in the day used shellac. At the same time, I also experimented with New Zealand native Kauri gum - both of these varnishes gave highly acceptable results and I am still using these today. 

To the left is a video of the varnishing process.

#makeportraits a bts look - Clare

A behind the scenes look at a recent portrait with Clare.


There is a considerable amount of preparation that goes into making just one wet plate collodion portrait. 

My preparation starts weeks before the proposed shoot with the acquisition and manufacturing of the chemicals involved in making an image.

Once the chemistry is sorted or in progress, I turn my attention to the sitter. Based on their most current image they send to me or on their public social media images, I start to create concept or mood board for the type of image I feel will suit their face for a portrait. I will often do this via Pinterest, although I usually keep upcoming portraits locked as private, only sharing them with the sitter or my creative collaborators.  

After creating a shortlist of images, either based on my preference, the sitters preference or my creative collaborators preference, I start deconstructing the lighting, then re purposing it for my own vision.

Check out the BTS images below and the commentary to read how the final image came about. Feel free to leave comments. 


Sitter: Clare McDonald

Collodionist: Paul Alsop

Creative collaborator: Ani Fourie

BTS Photographer: Shawn Rolton


Imperfect Imperfections

... pure chance, the perfect imperfection, I’d call it. It’s that can really work, bring a plate to life ......... other times it can completely kill it .....
— Ben Cauchi, interview, 2011
00001_2016-2-25.jpg

Making a mess

Wet Plate Photography is synonymous with imperfections, artifacts, nuances, those organic remnants of the physical process that is part of the labour of love, making an image appear as an object, where there was once only chemicals and metal (or glass).

The 'slovenly technique' of JMC was her trademark of the Victorian Era

The 'slovenly technique' of JMC was her trademark of the Victorian Era

People love these artifacts, there are even apps that add a wet plate filter / artifact to your digital photograph to give it the "wet plate look". During the early days of photography and the wet plate process, these imperfections were frowned upon. One of my most favourite examples of the shift in thinking around the need for perfection to a more relaxed appreciation for that of a more organic nature is that of Julia Margaret Camerons (JMC) approach to photography (if you haven't heard of JMC, and you are interested in photography, I encourage you to go away and look at her work/story).   

Cameron was 48 when she started to make images, her approach was to worry less about the perfection of the process and instead concentrate on the subject matter in hand, much to the horror of the photographers who were part of the Royal Society (now known as the Royal Photographic Society). These photographers 'masked out' their imperfections, with oval brass frames, hiding all the plate artifacts at the side of the plate. Camerons approach was to show her work, 'warts-and-all', which was a chance for the technicians to criticise her 'slovenly technique'

Page 49 of 'Julia Margaret Cameron - The Complete Photographs' by Julian Cox and Colin Ford, there is an analysis of one of her plates of George Norman Wade, that gives an insight into her working processes and the precise moments where she experiences difficulties. 

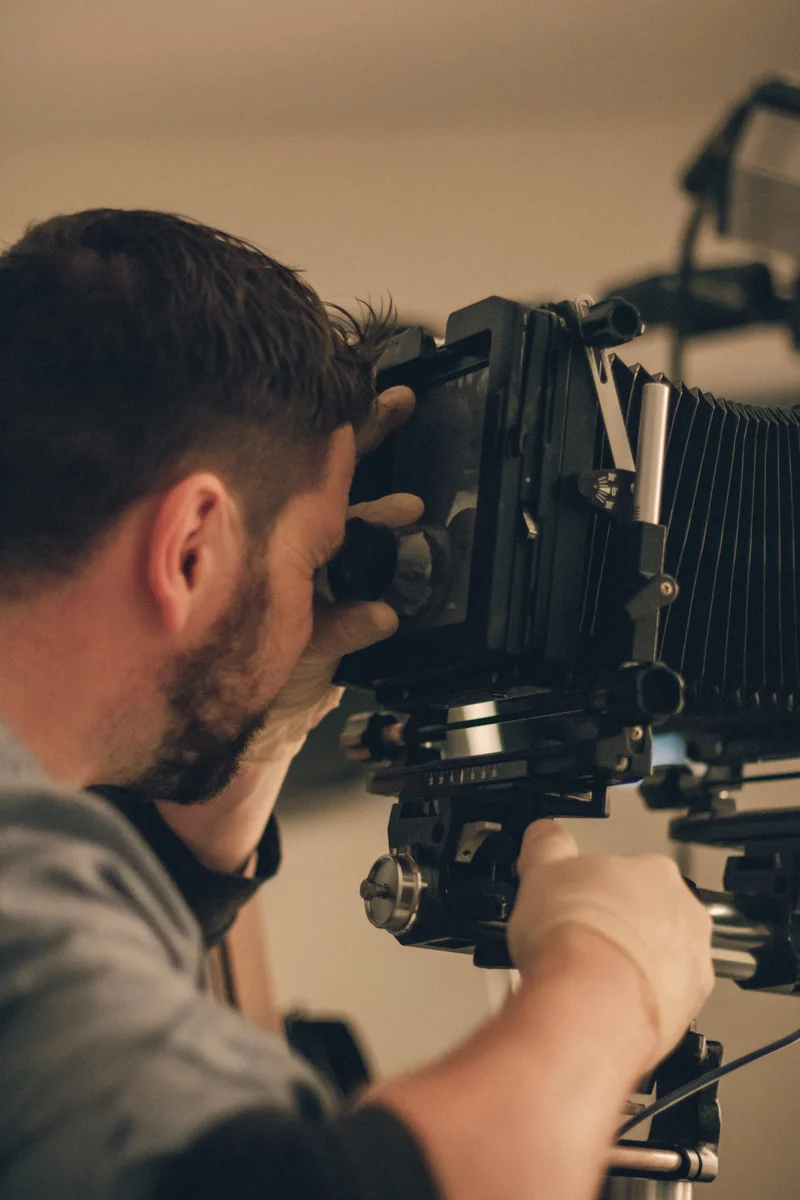
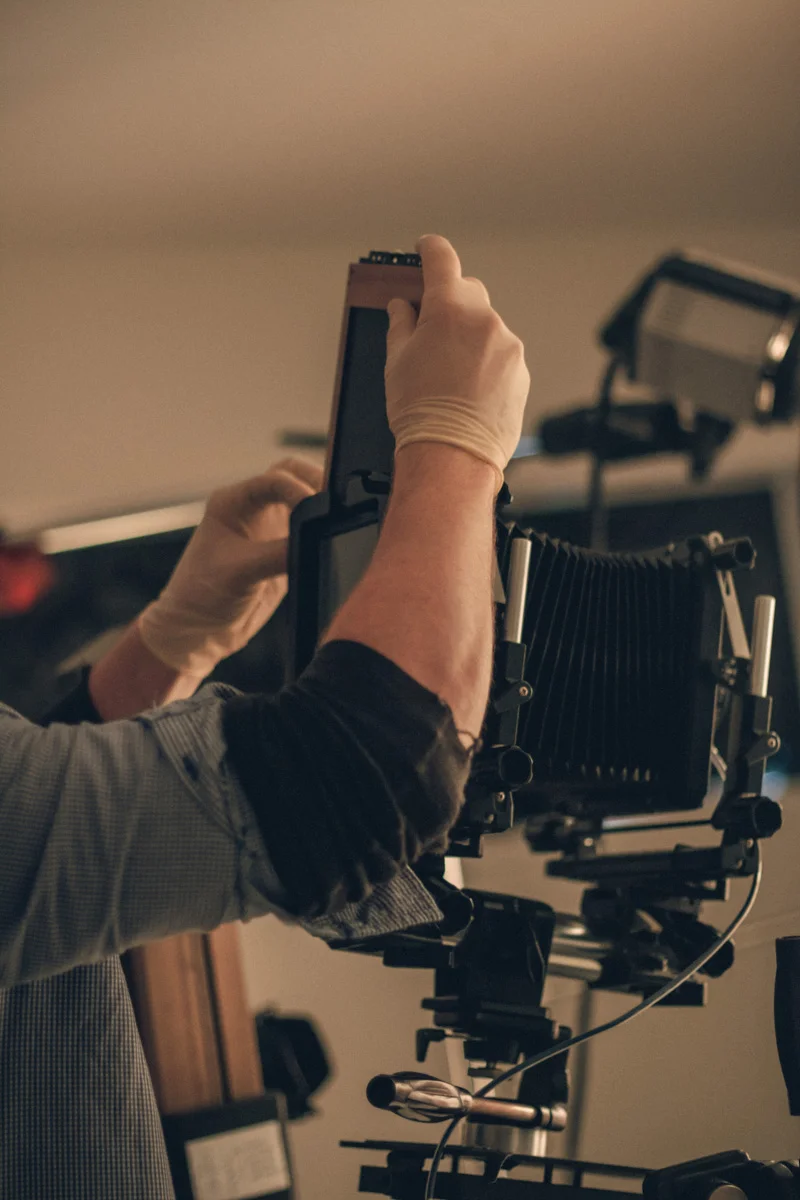
Over the past 4 years, I have mastered the art of Wet Plate. Of course, I use the term 'master' with the chivalry of defiance, as just as I think I have made every mistake that one is able to make, I get smacked in the face with a new one. My images are becoming more reproducible, however, no two images are ever the same, and this is only after 4 years of intense mastering (practice). 

My work horse camera and operating size is 4 x 5 inches, as it is easy to work with and economical (well, as economical as pouring liquid silver on a piece of metal can be). It takes a bit of encouragement to make plates bigger as by doubling the size, you quadruple the cost. For example, if a 4x5inch plate is worth, $400 at commission value, then a 10 x 12 plate would be worth in the order of $1,200. Of course the material cost would be less then the values here, but that topic is for another day.

Now, I could pour 4 x 5 inch plates in my sleep (and I'm sure I have amidst a hazy fog of anaesthetic ether), so going 3 times the size to 10 x 12 means I have to re-teach my muscle memory. This is a recipe for some Julia Margaret Cameron style 'artistic licence'

A recent shoot called for my very own 10 x 12 inch Victorian era camera to be broken out when I met Clare, of the Waikato based 'Freelunch Street Theatre Company'. We had made a few successful images on the smaller 4x5 format, so we decided to go big. The resulting image was a spectacular mess of artifacts and errors which I will go through below, however, despite this, the physical object, then end result is still rather intriguing. 

The mess explained.


  • A = Pour off edge. This is the where the collodion is poured off the plate back into the bottle, it is where the last part of the excess collodion leaves the plate and is at its thickest. (see me pour a glass plate here >> http://www.paulalsop.com/wet-plate)
  • B = Hesitation marks. Here I hesitated, or lacked fluency when inserting the plate into the silver bath, allowing the plate to sensitise at differing densities along the surface of the silver bath (the plate goes into the silver-bath at a 90 degrees orientation (landscape) to what you see here.  
  • C = The assistant factor. We are out of focus in the eyes. Once the image is focused on the ground glass screen and the plate is inserted into the back of the camera, the sitter must stay rock solid still, there is no time to refocus,  otherwise we risk them moving out of the plane of focus. On this occasion a simple well meant "chin up" direction from my assistant caused our sitter to move her eyes out of the plane of focus. 
  • D = Snot. This is a technical term, derived by me. Whilst pouring the plate, a bit of 'snot' or debris landed on the plate, to be embalmed in collodion and silver for eternity. This snot can be inorganic (like a piece of fluff) or organic (like an unsuspecting passing moth).
  • E = Comet. This is a smaller version of snot, this is a piece of dust that causes the imperfection to have a wee tail, hence - comet.
  • F = Signature. It doesn't get more authentic than this, as part of the process, I handle the plate and in almost every one of my plates has my finger/thumb print (serendipitously).
  • G = Moko. A moko is a Maori facial tattoo. I actually have no idea how this artifact occured, I think I may have caused physical damage when removing the darkslide from the plate, which gave our sitter Clare an unfortunate blood nose effect, or more endearingly, the moko she didn't know she had. 
  • H = Orthochromasia. The collodion process doesn't see red very well at all but sees blue very well. Clare has a fine detailed red tattoo on her upper arm, which is rendered almost totally black by the magic of collodion. 

A year in review

I started off this new site, blogging that "If you're not going to blog regular, then don't blog".

Well, I may have to rethink that in the new year. As always, life gets in the way and I have literally been too busy to keep up with the regular blogs and here's why.

2015 has been an epic year, for my life and for photography. You're not here to read about the life stuff, so here's a bit about what happened with photography.

I was a bit bummed out that I was selling my house and also my garage darkroom, the prospect for making wet plates in 2015 wasn't looking good. However, before packing all my gear away for who knew how long, I had one last thing to do, make a plate of my good friends A'sha and Dylan on their wedding day. I remember one of the comments on the image after making it and showing social media was "you shot wet plate at a wedding? man you have balls!"

Image courtesy of Danelle Bohane 

Image courtesy of Danelle Bohane 

Around the time of moving from the Coromandel Penninsula to the Bay of Plenty, I contracted a pretty nasty dose of Hand, Foot and Mouth disease - lying on my 'deathbed' I received an email from Tracy Stamatakos of OneBlackSheep and NZIPP asking if I would be interested in being a keynote speaker at their annual Infocus photography conference in Queenstown. This made me feel heaps better!

An awesome line up, what on earth was I doing in there?

An awesome line up, what on earth was I doing in there?

The photography stopped with the wedding plate being taken 7/2/2015. The next image wasn't made until 24/5/15, mainly because I had lost access to a dark room, which is essential to wet plate photography. Nevertheless, I had a plan.

After searching for a variety of different options, I settled on buying a retro caravan and set about turning it into a mobile darkroom, this meant, I didn't get our rental property stained with silver, but it also meant I could be mobile.

The mobile darkroom on the road

The mobile darkroom on the road

The story of the mobile darkroom caravan was picked up by the popular international photography blog Petapixel (click here to read) then subsequently a story was run by the Sydney Morning Herald (click here  to read ).

That's enough for the year already right? Turns out, no, there was still alot more in store! 

I had 3 exhibitions, one at the New Zealand Art show, one at The Wallace Gallery and another at Adrian Worsley Gallery.

Wallace Gallery exhibition

Wallace Gallery exhibition

Exhibition and making plates at Adrian Worsley Gallery

Exhibition and making plates at Adrian Worsley Gallery

In August, I was flown down to Queenstown to speak at the New Zealand Institute of Professional Photography annual conference, which was awesome for 3 reasons, a) here is a doctor talking to 200 professional photographers about photography for an hour b) I got to go to Queenstown in the snow c) I got to do it with my family.

After the 2015 NZIPP conference

After the 2015 NZIPP conference

Something that had been on my mind during the conference was the opportunity to make images with Luke White again at Kingsize Studios the largest and best studio in New Zealand, we made portraits for our collaboration 'The Auckland Project'. Again, I was lucky enough to be featured in the international photography blog Petapixel (to read more click here). 

The images were also featured in the international magazine BLUR which is dedicated to creative photography.

Making images at Kingsize Studios - Image courtesy of Lee Howell

Making images at Kingsize Studios - Image courtesy of Lee Howell

A surprise email from TVNZ led an interview and segment on the NZ primetime TV show Seven Sharp. To watch it click here

Kristen Hall of TVNZ and Seven Sharp came for a visit

Kristen Hall of TVNZ and Seven Sharp came for a visit

Finally I collaborated with a bunch of hairy fellas for Decembeard, making tintypes to raise awareness of bowel cancer in New Zealand.

An ongoing project for 2016

An ongoing project for 2016

And that was pretty much it for 2015 photography-wise. In the 'background, I also moved house twice, moved job twice and had a baby!

I'm looking forward to 2016 with already a few things in the pipeline, however, it would be hard to beat 2015!